
Introduction
Publishing your first website on GitHub is a powerful way to learn modern web development fundamentals while building real, shareable projects. In this beginner‑friendly guide, you’ll learn how to create a simple “Hello World” website using HTML and CSS, edit it in VS Code, and publish it to GitHub step by step—no prior experience required. By the end of this tutorial, you’ll understand the basic GitHub workflow and have a live project you can confidently share or build on.
What You'll Learn in This Tutorial
- Overview of HTML, CSS, VS Code, and GitHub
- What "publishing" means for a beginner project
In this tutorial, you’ll learn how to take your very first step into web programming by creating and publishing a simple “Hello World” website using HTML, CSS, Visual Studio Code, and GitHub. We’ll start from the basics—setting up your project files and writing clean, beginner‑friendly code—then walk through the exact steps needed to upload your project to GitHub so it’s stored safely online and easy to share.
You’ll also gain a practical introduction to the GitHub workflow, including creating a repository, uploading files, and understanding how code moves from your local computer into a public project. By the end of this guide, you won’t just understand the theory—you’ll have a real, published project that proves you can build and share a website, forming a strong foundation for learning more advanced web programming concepts.
Tools and Prerequistes
Before we publish our first “Hello World” website on GitHub, let’s make sure you have the right tools in place. The good news is that everything you need is free, widely used, and beginner‑friendly. If you’re brand new to web programming, don’t worry—each tool listed below is standard across modern development workflows.
First, you’ll need Visual Studio Code (VS Code), a lightweight and powerful code editor used by developers around the world. VS Code makes it easy to create and edit HTML and CSS files, organize your project folders, and preview your work as you go. Once installed, it will become your main workspace for writing code in this tutorial and future projects.
Next, you’ll need a GitHub account. GitHub is a platform for storing, sharing, and publishing code online. In this tutorial, GitHub will host your project and allow you to upload your files so they’re accessible from anywhere. Creating an account is free, and we’ll use GitHub’s web interface to publish your first project—no command line experience required.
You’ll also need a modern web browser, such as Chrome, Edge, or Firefox. This is how you’ll preview your “Hello World” website locally before publishing it to GitHub. Browsers are an essential part of web development because they show exactly how your HTML and CSS are rendered.
Finally, it helps to have a basic understanding of files and folders on your computer—such as creating a folder, saving files, and navigating directories. No prior programming knowledge is required. If you can create a folder and save a text file, you’re ready to get started.
Once these tools are set up, you’ll have everything you need to build, style, and publish your first website with confidence.
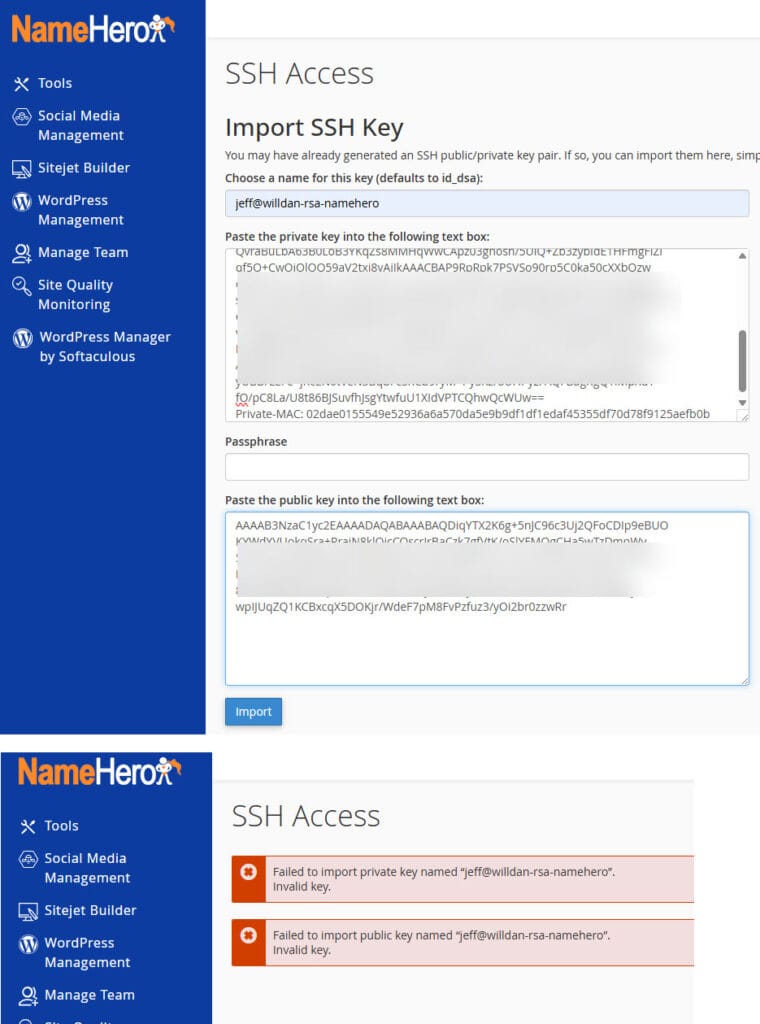
Step 2. login to NameHero cPanel to paste the public key
cPanel -> Security -> SSH Access -> Manage SSH keys -> Import Key
Installing Visual Studio Code
YouTuber Coder Coder - VS Code for Absolute Beginners
YouTuber The Common Coder - Installing Visual Studio Code on Mac and Windows (Step-by-Step)
Install Git on Windows
YouTuber - The Common Coder - How to Install Git on Mac and Windows! (Beginner's Guide)
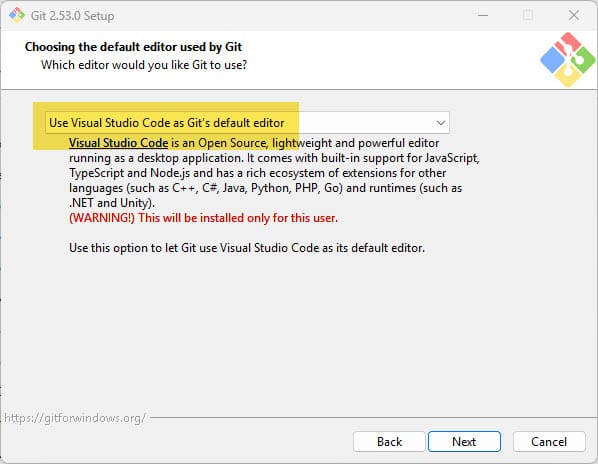
Install Git for Windows, go to https://git-scm.com/download/win
Default editor select Use Visual Studio Code as Git's default editor
Override the default branch name for new repositories: main
Make sure to select the option "Git from the command line and also from 3rd-party software" is selected.
Use bundled OpenSSH
Use the OpenSSL library
Checkout Windows-style, commit Unix-style line endings
Use MinTTY (the default terminal of MSYS2)
Only ever fast-forward
Git Credential Manager
Enable file system caching
Once installed, open VS code. At the terminal screen
PS C:\GISE\GIS Engineering\GISE - Documents\ProjectsComputer\Typescript> git --version
git version 2.53.0.windows.1
PS C:\GISE\GIS Engineering\GISE - Documents\ProjectsComputer\Typescript> git --help
usage: git [-v | --version] [-h | --help] [-C <path>] [-c <name>=<value>]
           [--exec-path[=<path>]] [--html-path] [--man-path] [--info-path]
           [-p | --paginate | -P | --no-pager] [--no-replace-objects] [--no-lazy-fetch]
           [--no-optional-locks] [--no-advice] [--bare] [--git-dir=<path>]
           [--work-tree=<path>] [--namespace=<name>] [--config-env=<name>=<envvar>]
           <command> [<args>]
next set the default username and email as used in your GitHub account
PS C:\GISE\GIS Engineering\GISE - Documents\ProjectsComputer\Typescript> git config --global user.name "BarefootBetters"
PS C:\GISE\GIS Engineering\GISE - Documents\ProjectsComputer\Typescript> git config --global user.email "jeff@barefootbetters.com"
Creating a free GitHub account
Visit www.github.com to create an account. Enter a unique username (typically your name or company name). In my case created username barefootbetters and password Normalweb.
The default URL is https://barefootbetters.github.io
If you have purchased your own domain and web hosting service, you can add a CNAME record to your DNS (mine is hosted on Cloudflare.com). The custom URL looks like this:
https://github.barefootbetters.com
Install Vue
Basic understanding of files and folders on GitHub
Before publishing your first project, it’s helpful to understand how files and folders work on GitHub. If you’ve ever saved documents on your computer inside folders, you already understand most of what you need—GitHub simply stores those same files online.
On GitHub, each project lives inside a repository, often shortened to “repo.” A repository is essentially a folder that contains all the files for your project. For this tutorial, your repository will hold simple web files like index.html and style.css. These files tell the browser what to display and how it should look.
Inside a repository, files are organized exactly like they are on your computer. You can place files in the main (root) folder or group them into subfolders if needed. For example, many projects eventually use folders like css, images, or assets, but for your first “Hello World” project, keeping everything in one folder is perfectly fine.
GitHub also keeps track of changes to your files. Each time you upload or update a file, GitHub records what changed and when. This makes it easy to fix mistakes, review progress, or return to an earlier version of your project later on. In this tutorial, we’ll keep things simple and focus only on uploading files—no advanced version control knowledge is required.
The most important thing to remember is this: GitHub does not change your files. It simply stores them and makes them accessible online. If your website works correctly on your computer, the same files will work when uploaded to GitHub.
With this basic understanding, you’re ready to move on to creating your project and publishing your first website with confidence.
Creating Folders on GitHub (Why Empty Directories Don’t Work)
One important thing to understand when working with GitHub—especially through the web interface—is that GitHub does not allow you to create an empty directory by itself. This isn’t a bug or a missing feature; it’s how Git works under the hood. Git tracks files and their contents, not empty folders, so a directory must contain at least one file in order to exist in a repository.
If you try to create a folder on GitHub without adding a file, you’ll notice there is no “Create Folder” button. Instead, folders are created implicitly when you add a file inside them. This behavior often confuses beginners, but once you understand it, the workaround is simple and reliable.
The README.md Workaround (Recommended for Beginners)
To create a directory using the GitHub web interface, you simply create a file inside the folder you want, and GitHub will automatically create the directory for you.
Here's how it works:
- Open your repository on GitHub
- Click Add file -> Create new file
- In the file name field, type the directory name followed by a forward slash "/", then the file name. For example:
src/README.mdCommon directory structure
ProjectName/
│
├── hello-world/ │
├── package.json │ ├── tsconfig.json │ ├── hello.ts │ └── hello.js │ ├── file-reader/ │ ├── package.json │ ├── tsconfig.json │ ├── readfile.ts │ ├── api-test/ │ ├── package.json │ ├── tsconfig.json │ ├── index.ts │ └── README.md (optional)
Step 1: Create Your Hello World Project
asdf
Setting up a project folder
asdf
Creating your index.html file
asdf
Writing your first "Hello World" in HTML
asdf
Step 2: Add Basic Styling with CSS
asdf
Creating a style.css file
asdf
Linking CSS to HTML
asdf
Simple styling for text and layout
asdf
Step 3: Open and Test Your Project is VS Code
asdf
Opening the project folder in VS Code
asdf
Previewing your site in a browser
asd
Common beginner mistakes to avoid
asdf
Step 4: Create a GitHub Repository
asdf
Creating a new repository on GitHub
asd
Naming your repository correctly
asdf
Understanding public vs private repos
asdf
Step 5: Publish Your Project to GitHub
Before you can Commit your files to GitHub, need to provide a commit message such as "initial commit"
Uploading files using GitHub's web interface
asdf
Verifying your project files on GitHub
asdf
Confirming your Hello World project is live
asfd
What's Next After Hello World?
asdf
Improving your site layout
asd
Adding JavaScript/TypeScript
asdf
Publishing with GitHub Pages or Cloudflare Pages
asdf
Example - Modern Master Strike
Download project zip file from GitHub - vtson/testmaster · GitHub by cliicking on the green Code button and select Download ZIP. Save to your home directory: C:\Users\jjensen\bbcode\testmaster-master.zip
Open vs code and the terminal
PS C:\Users\jjensen\bbcode\testmaster-master> npm install

added 102 packages, and audited 103 packages in 8s

17 packages are looking for funding
  run `npm fund` for details

found 0 vulnerabilities
PS C:\Users\jjensen\bbcode\testmaster-master> npm run dev

> master-strike-modern@0.0.0 dev
> vite

(node:67824) [DEP0040] DeprecationWarning: The `punycode` module is deprecated. Please use a userland alternative instead.
(Use `node --trace-deprecation ...` to show where the warning was created)

  VITE v8.0.0-beta.16  ready in 2549 ms

  ➜  Local:   http://localhost:5173/
  ➜  Network: use --host to expose
  ➜  press h + enter to show help
Final Thoughts
asdf
Why publishing early matters
asdf
How this project fits into learning web programming
asdf


0 Comments